Welcome to the Get Going website template setup guide!
The template is designed to help non-technical startup founders and hobbyists, like you, create a website quickly, easily and importantly, for free!
It's built with the belief that when your startup is just an idea, a simple website can be a useful tool to help talk to customers and collaborators by showcasing your vision. However, tools like SquareSpace can be tricky, time consuming and expensive.
Given the most important things at this stage is to talk to customers and build your product, the aim is to spend as little time possible building your first website. That's why this template only includes the important elements to “Get Going”, limiting the decisions you need to make and thereby freeing you to spend your time on better things.
I say the template is best suited for people that are pre-product simply to avoid wasting your time, as I believe once you have a product to sell, it's probably worth spending a bit more time and money on a fully custom website to better showcase your product.
But, if you're in that magical idea phase and want to build a website to help share your idea with others, I think you're in the right place.
The template has a few key elements that you can choose to include:
Regardless of whether you're here with just an idea, or already have a logo and other branding at the ready, this guide will walk you through all the steps needed to build your website.
By the end, not only will you have a professional site for customers to visit, but you will also likely leave with a better understanding of your branding and the mission you want to achieve.
I hope this guide will serve as a resource you can return to throughout your startup journey as I've tried to pack it full of useful things that exist out there for founders.
Before we dive in, a word of note on how to use this template.
The aim of this template is to help you get going on your startup by making your website quickly. Therefore it's important not to be too much of a perfectionist; at least for now.
In the guide I have included steps and resources to help you do things that may not be essential for you just yet, like making a logo or deciding your brand colours. These are here to help you whenever you may need them, but ultimately it is up to you to decide whether you are at a stage where these things are important.
To help inform this decision, at each step I have outlined whether it is necessary for creating your website. However, regardless of whether you choose to skip a step or not, do follow the guide in order, as some later steps will rely on things done earlier.
Depending on how deep you dig into each of these elements will determine how long this website takes to make, but to get an initial site you can share, with an email form, scheduling and custom branding it should take around 1.5 - 2 hours.
Don't worry if some topics seem unfamiliar at first - I've crafted these instructions to be usable regardless of your technical background. Also if things feel hard, that just means you're learning something new!
If you're really stuck on a step and the trouble shooting points I have outlined don't seem to work, then don't worry! You can DM me on X and I'll get back to you with help as soon as I can.
Rather than charge a fee like many other templates out there, I decided to make this template free as I hope it can help a lot of startup founders get going on the track to achieving their dreams.
If you have found this template valuable and are able to support me I would be extremely grateful if you bought me a coffee using the button below.

You can also follow me on X @lucaducca or join my launch list to hear when I launch new projects (I'm aiming to launch a new startup every 2 months for the next year!)
Ok, with all that said and done, let's get going!
Estimated time: 5-15 minutes
I know I said that this template allows you to make and host your website for free, and it does, but this is the only step where you might want to consider spending a small bit of money ($6). That's because this step talks through purchasing a custom domain that you can use for your website.
A domain is your website's address on the internet (like www.yourcompany.com). It's how customers will find you online.
You can buy these website addresses from domain providers. We'll use Namecheap in this guide, but you can use any domain provider you are most comfortable with.
You might be unsure on what you want to call your startup and therefore don't know what domain name to buy. That's ok. This template is designed so you don't need a custom domain to set up your website so you can skip this step, however I do recommend getting one.
Having a custom domain will help to legitimise your website when sending it to people and you can transfer it to any future website you make. You can get a .com domain for as cheap as $6 for the entire year, so worst case you change your mind on what your startup name is and have to buy a new domain. Just make sure you buy a cheap domain name to start with.
If you're stuck on what to call your startup you can get the help of ChatGPT. Go to ChatGPT.com and enter a prompt like "Generate 10 unique startup names for a company that [describe your business]". Then pick a name you like and check on Namecheap.com whether that domain name is available for you to purchase.
You may find that in many instances the .com for your preferred domain is already registered. This is because .com is the most popular domain extension on the internet. If this is the case you have 2 options. Either change your startup name to secure the .com or use a different domain extension. This article shows the most common domain extensions in 2024 with some other popular options you can use at the bottom.
However, if the domain name that most closely matches your company name belongs to a potential competitor, then to avoid problems down the line you may need to consider using a different company name.
If you already have a custom domain for your project or don't want to get one then you can skip this step.
For more detailed instructions, check out Namecheap's domain registration guide.
Estimated time: 5-10 minutes
In this step you will be making a copy of the Get Going Website Template that you can use and make your own. We will use GitHub pages to host the website so that other people on the internet can access it.
GitHub is a popular platform that website developers use to store and manage code. The Get Going template is saved here, and we'll use GitHub to host your website too.
First off, GitHub allows you to host your website for free, which is seriously hard to beat. GitHub also has built in editing, which makes it easier to edit your site without downloading additional software and means you never have to download the Get Going template onto your computer. GitHub is used by over 100 million software developers around the world so it is a trusted platform and will be adequately equipped to handle all levels of traffic your website may encounter.
Before we get going, here's some GitHub language that may be helpful to understand:
After pressing "Create repository" you will be taken to your newly created repository page.
Your repository has 5 files inside of it (pictured below). Keep this page open as we will be making edits to the files LICENSE, inputs.js and logo.png in future steps.
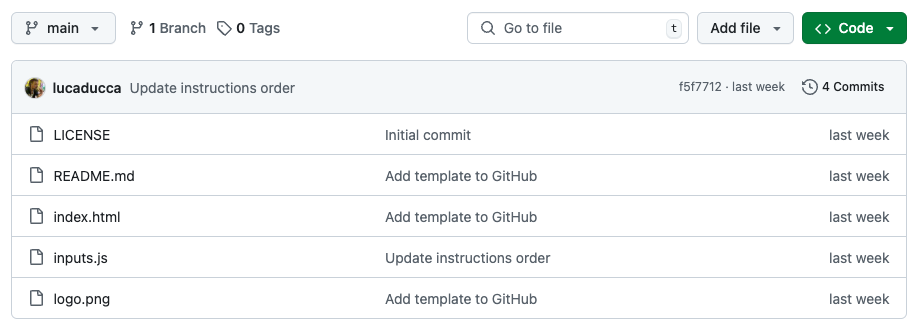
If you accidentally leave this page, go back to GitHub.com, go to "Your profile" and click "Repositories" which will show a list of all of your repositories. Click the one for this project.
Estimated time: 5-15 minutes
Following the previous step you now have your own copy of the Get Going template on your GitHub, free to edit as you wish.
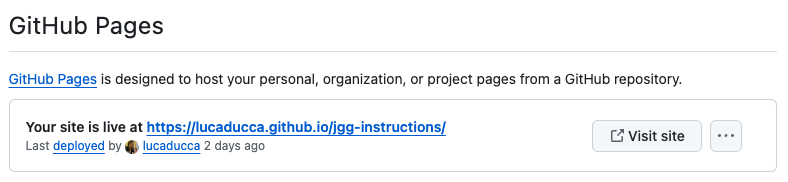
In this step we will host your newly created website using GitHub pages, making it accessible to everyone on the internet.
Estimated time: 5-10 minutes
This next step is a quick and easy one where we will decide on a primary brand colour for your website and get the HEX code for it (we will need this for future steps).
If you already know what you want your brand colour to be then that's great! Just make sure you have the HEX code for it. To do this you can use HTMLColorCodes.com to pick the colour you want and copy the HEX code (it looks like a # followed by 6 digits e.g., #E50914 is the HEX code for the iconic Netflix red).
If you're not sure what colour you want to use, you can check out USBrandColors.com for inspiration from some of the most iconic US brands.
You can also check out Coolors.co for further inspiration based on trending colour palettes.
Remember not to overthink it at this stage. You can always change your mind down the road so for now lets just get going!
If you want to keep it simple, below are the HEX codes for some standard colours that you can use:
Whatever colour you pick, make sure you keep a note of the HEX code so we can use it later.
Estimated time: 15-30 minutes
EmailOctopus is an email marketing platform that allows us to gather customer emails through an input form. This allows us to start building a mailing list and most importantly means when it comes to launching our product we can let everyone who registered their interest know about it.
There are many email marketing platforms out there, including well known brands like MailChimp and Brevo. I chose EmailOctopus for this template as they:
The form will allow site visitors to sign up to your mailing list, wait-list or whatever other marketing list you choose to use it for. Either way it is a great opportunity to get the contact details of people who are interested in your idea so I recommend doing this step.
However this step is still optional so you can skip it if you want.
Note: To comply with anti-spam laws, email marketing platforms like EmailOctopus require you supply a physical address when creating an account that will be included in all emails sent to your mailing list. If you don't want to use your home address this should be a business address, PO box, co-working space address or any other physical address where you are able to receive mail and have consent to do so. Some other examples of spaces you can use can be found in this article. If you already have one of these available to you, then you can skip part one of this step. Likewise, if you just want to set up your website for now and don't plan to email your mailing list anytime soon then you can use your personal address to set up an account and change it when you're ready to send commercial emails by returning to part one (just don't forget as your personal address will be included in the emails you send). If neither of these apply to you then follow step one, which will walk you through securing a free pay-as-you-go postal address that you can use.
If you have followed part one and are waiting for your ID to be verified to get your new address, you can either pause here and return once your new address has been confirmed in ~24hrs or you can use your personal address to create an account for now, then change it once you have received your new address. Either works!
<script> codeFor more detailed instructions on creating a form or to customise your form further, check out EmailOctopus's video guide.
Phew! I'm glad that's done. That was a tricky step so well done! We're now on the home stretch to having your new website made!
Let's do a recap on the progress we have made so far:
Estimated time: 10-15 minutes
Calendly is an online scheduling platform that allows people to easily schedule meetings with each other. It allows you to integrate your calendar (e.g., Google, Outlook etc.) so people can only book a meeting with you when you have availability.
Calendly is a well known brand providing a simple solution that fits our purpose. I chose it for this template as:
If you're not planning to conduct any customer interviews yet or do not want any other meeting scheduling ability then you can skip this step.
Nice work! We now have EmailOctopus and Calendly set-up to use in your website.
However before we move onto the next steps of connecting these to your website, I want to give some advice to help avoid some common errors.
When updating the inputs.js file, it's important to wait a few minutes to give enough time for GitHub to upload your changes to your live website. So after committing your changes make sure you wait a few minutes to see them appear on your website.
It's important before moving on from a change you have made to test that it's working as it should. This helps to avoid the "blank screen of death" as I call it, which I will show you in a second. It also means that if something does go wrong you know exactly what caused it and can isolate the issue to one line which helps A LOT when debugging. So take the time to test changes after committing them - I promise it's worth the effort!
I've given it a scary name, but I promise you it's not that scary. It just means something has gone a bit funny with one of your inputs. If you follow the above advice you are less likely to encounter this problem and if you do come across it you are likely to be able to solve it a lot quicker.
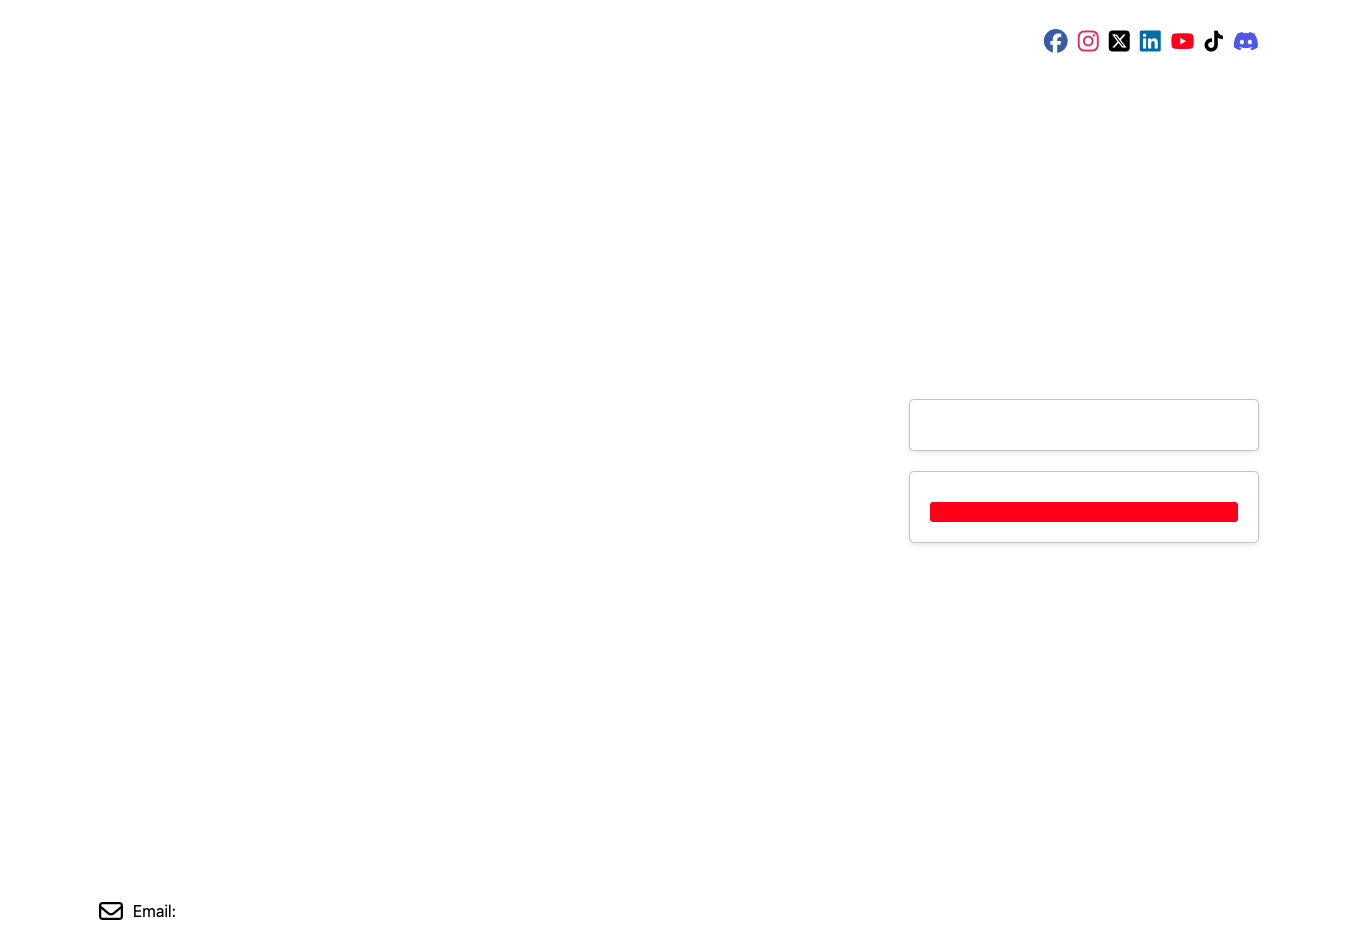
The image above shows what the blank screen of death looks like, which is basically all your features (EmailOctopus form, mission statement etc.,) disappearing! Below I have outlined some simple mistakes which might cause this problem (some of which you may have already faced when implementing the EmailOctopus and Calendly links):
Estimated time: 10-20 minutes
In this step we will be bringing it all together so that customers can join your mailing list and schedule meetings directly from your website.
We will be heading back to GitHub to edit the template you have saved there. Remember those EmailOctopus and Calendly links I said to keep handy... make sure to have them ready for this step.
Even if you are not including the EmailOctopus form or Calendly in your webpage you should follow these steps to ensure they are removed.
inputs.jsconst emailOctopusScript =const emailOctopusScript = ''inputs.js file is correct: It should look like the below and be surrounded in ' ' single quotation marks
inputs.js, which is the same file we used to insert the EmailOctopus scriptconst calendlyLink =const calendlyLink = ''inputs.js file is correct: It should look like the below and be surrounded in ' ' single quotation marks
Congratulations! Most of the hard work is now done. You now have a live website with an integrated mailing list and interview scheduling functionality! How exciting!
Now it's time to make the site fit your brand with these final two steps.
Estimated time: 5-25 minutes
Already have a logo? Great! This step will walk you through adding it your website.
No logo? Don't worry! Choose the section below based on whether you want to make one now or not.
In short... No. Making a logo is completely optional and can be saved for a time when you have a better idea of what your startup is.
Avoid being a perfectionist in this step. If you want to make a logo, make it simple. Otherwise don't make one yet and return to this step when you've validated your idea with customers a bit more.
inputs.jsconst logoFileName = and delete logo.png from between the ' ' single quotation marksBelow I have provided two options you can use for creating a logo free and easily. You can choose whichever option sounds best to you or use a completely different platform, the choice is yours!
Option 1 (Recommended): Canva - Create your logo from a template using the well loved Canva design platform
Option 2: Shopify - Create your logo using Shopify's new AI logo maker
logo.png file to open the 'NOTFLIX' logologo.png should now be deleted from your repositorylogo.png)logo.png file in your repositorylogo.png then you either change it to logo.png and upload it again, or follow the instructions below:inputs.js fileconst logoFileName = and replace logo.png with your logo file name between the ' ' single quotation marksEstimated time: 20-40 minutes
Now for the final and most exciting part. This is where you can really get creative and make your new website reflect your brand.
We'll be working in the inputs.js file for this step. In each case you can leave a field blank if it's not relevant to you, and either that element will be removed or a default value will be used.
We will start by working through the high priority changes you must make for the page to become your own, then move onto more optional, lower priority changes after.
After each change you make to the input.js file you can check to see how it looks by following the below steps:
I mentioned earlier that one of the reasons causing the "blank screen of death" is using an apostrophe ' in your mission statement or other inputs. That's because these apostrophes get confused in the code with the ' ' single quotation marks we wrap around each input.
There's a simple fix and that is adding a \ backslash before the apostrophe anytime you want to use one.
So for example, if you want to say "My company's goal is...", in input.js you will have to write "My company\'s goal is..." instead
It's a little annoying I know, but it's just one of those things!
input.js:
inputs.jsconst companyName = and between the ' ' single quotation marks replace NOTFLIX with your startup nameconst companyNameColor = and between the ' ' single quotation marks replace #E50914 with the HEX colour code you decided on for your brand in Step 4: Choosing your brand coloursconst formButtonBackgroundColor = to change the Calendly link button to your chosen brand colourconst formButtonTextColor = . The colour currently between the ' ' single quotation marks is white (#FFFFFF). If your brand colour is very light, you should change this to black (#000000). If your brand colour is darker, then you can leave it as whiteconst facebookLink =)const headerText = and const descriptionText =headerText should be used for your succinct one-line mission statement and descriptionText can be used for a slightly longer supporting descriptionconst headerTextSize = and const descriptionTextSize =const contactEmail = and between the ' ' single quotation marks replace example@notflix.com with your email addressconst pageBackgroundColor = and const pageTextColor =const formTextColor = and update the HEX colour codeconst socialMediaCallToAction =const meetingCallToAction =const meetingButtonText =const formBackgroundColor = and update the HEX colour code if needed (for example to match your new page background colour)const formBorderColor = and update the HEX colour codeThat's it! Make sure to commit your changes so they are saved to your live website. Feel free to play around with each element using the instructions as time goes on.
Congratulations! You now have your very own website, completely free to host. It should serve as a great starting point for your startup journey.
Remember, you can always come back to this guide and use it to edit your website as time goes on.
If you have found this template valuable and are able to support me I would be extremely grateful if you bought me a coffee using the button below.
Or share the template with people you know using these buttons.
You can also follow me on X @lucaducca or join my launch list to hear when I launch new projects (I'm aiming to launch a new startup every 2 months for the next year!)
If there are any additional features you would like to see in the template, then you can suggest new features here.
Here's a list of helpful resources for building a startup.
If you find any other great resources to share, then message me on X: @lucaducca
Links for how to get started and do more with EmailOctopus such as sending your first email campaign
YCombinator is a renowned startup accelerator that has helped launch companies like Airbnb, Stripe and DoorDash. Their advice is great for new founders looking to build huge companies:
Simon Squibb is a serial entrepreneur and angel investor based in the UK. He runs a platform called HelpBnk where you can get free business advice and has many great videos on his YouTube offering a wealth of business knowledge:
If you're a non-technical founder interested in learning to code, The Odin Project offers free, comprehensive coding courses: